
This project has been a long time coming. I’ve wanted to create something with pallets for months, yet couldn’t decide what and didn’t have any pallets. Lucky for me, but the time I decided the perfect DIY pallet art is a map of the USA, we came upon a stack of old pallets with a nice “FREE” sign on them. The Texan and a friend loaded them up and brought them home.
The Texan was kind enough to rip the boards off the pallet frame and match the wood from a different pallets to create a more rustic look. While he was busy with that, I headed out to grab the other supplies we’d need to complete this project.
- Engineering Print with design cut out to use as a stencil (I purchased mine from Staples, for about $4)
- 2 Colors of Paint (I snagged a 50¢ quart of blueish-grayish-whiteish paint from the OOPS rack, and had a sample size of Behr’s Chai Tea mixed for $2.)
- 1 X 2 X8 (I used scrap wood!)
- Screws and screw driver
- Painting supplies (brushes, painters tape, drop cloth, etc.)
- A ruler and a pencil
- Heavy duty picture hanging wire and nails or screws to hang the finished pallet art
The beauty of writing a tutorial AFTER you complete a project, is that you can tells others WHAT NOT TO DO! And save people from finding themselves laying on the floor under your child’s former crib railing trying to line up the map.
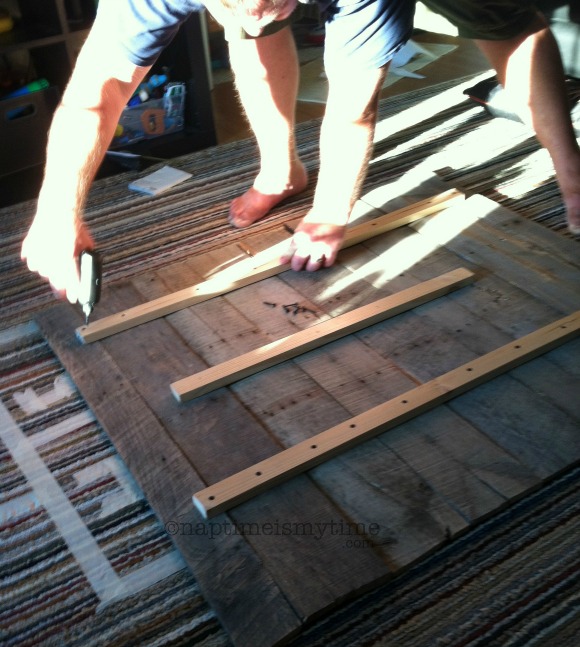
Having said that, the very first thing you should do after removing your boards, sanding them, and cutting them to ensure they’re about the same size is to decide on the layout of your pallets. Which boards look best next to one another? Are there any imperfections that you won’t be able to paint over or attach screws through? Check your boards carefully for any splits and avoid attaching your supports to them.
Once you decide how your pallets should line up, use your 1 X 2 X 8 to attach the pieces together. Remember to use a level so your brace is straight. Your pallet boards don’t necessarily need to be straight, but you should ensure the brace is as you’ll be using that to hang it. (Yep, that’s an indoor hopscotch court under the pallet.)
With your boards attached, flip your pallet over and place your silhouette on top and trace the outline. You’ll have to push hard because the wood is quite difficult to write on. Keep your sharpener close by.

It looks so cool with the map on it, doesn’t it?
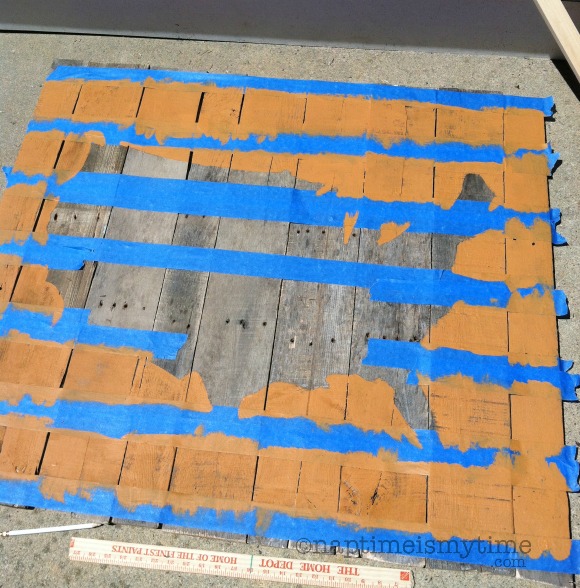
I thought about doing a chevron pattern for the background, but realized I’d need a stencil for that. I was too impatient to create one, so I went with stripes. My stripes are about four inches wide. When you’re taping them, pay close attention to your pencil lines to ensure your stripes remain the right size! Take care to push your tape down securely, you don’t want any paint to drip below the lines.
For me, it made sense to first paint the stripes that would not be touching the outline of the United States first. I used a larger brush, and quickly filled these in. It was blazing hot the day I worked on this project, I’m quite sure the first stripe was dry before I painted the second one!

In no time at all, I had all of my stripes painted. It looks awesome already, don’t you think?
Next it was time to fill in the silhouette. This was more time consuming because you really have to pay attention around the edges to ensure your line is smooth. I used a cheap paint brush that belonged to The Boy, I’m sure if you were using a new brush that wasn’t used by a preschooler it would be much easier!

The blueish-grayish-whiteish oops paint was perfect for the map! I didn’t put the paint on very thick because I wanted some of the wood to show through. I was going for a rustic look and think I achieved it!

This project was fun to make and I love knowing that The Texan and I created it with our own hands. The total cost was less than $10!


Awesome idea!
Thank you! We love how it turned out – and it’s great to have a custom piece of artwork that wasn’t made by a toddler! 🙂
Wow! That looks AWESOME!
It was hard work, but we are totally in love with it!
I am hoping that when we move, I’ll be able to fulfill my dream of making pallet pictures!
It’s hard work getting the boards off, but so gratifying to have something unique that you created with your hands!
This is amazing! I wish I were this crafty. Thanks for breaking it down for me; hopefully, I’ll have time to do it one day.
For me, this project required more patience than craftiness!
That looks great!! Love the orange!
Thanks, Chelsea. I chose orange for it’s fun POP of color. The rug in this room has orange in it, the pallet art is a great complement to it!
Love Love Love this!!! Thanks so much for the tutorial! I would love to try this for my state!
I’d love to see a photo if you do make one! Ours is one of my favorite pieces of art!
This is amazing! LOVE It thanks!
This is awesome, Emily! It looks great above that couch, too!
Thanks, Ronda! We absolutely love it!
I’ve been procrastinating on doing something similar because I’m chicken. You make it look easy, so maybe I’ll dive into it soon. Maybe. 🙂
Super Duper Cute!
It’s time consuming, but not very hard! Would love to see your version if you create one!